Back to Software
We no longer use this software. This page is here for historical reference only.
This software is used with the Subzero Cooldown Dewar to control final Subzero Cooldown.
Installation
1. Determine which folder the software will be "installed" into. This is usually C:\CryoSubzeroCooldown\. Create folder, if needed.
2. Delete existing files within that folder, if needed. Leave the data folder.
3. Copy the files from the most recent dated folder from the network \\Storage\Software\CryoSubzeroCooldown\ into the local C:\CryoSubzeroCooldown\.
Click C:\CryoSubzeroCooldown\CryoSubzeroCooldown.exe or use a shortcut on the desktop
When the Startup window comes up, check the settings and click Start. This will immediately begin recording temperatures to the data file.

As long as the software is open, it will automatically plot on screen in the graphs as well as to a .csv text file. The text file is set to read-only during this time, but it may still be opened for viewing from the Setup window. It will add one row per minute to the file in real time, and never requires any further input from user to ensure that it is saving data. The fields saved to file are: Date, TimeOfDay, Temp0, Temp1, Temp2.
General usage is very similar to the Perfusion Monitor Software, and you should thoroughly understand that software prior to using this software.
Cooling Curve
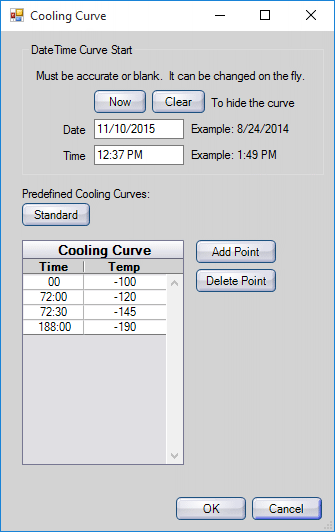
Click the Curve button at the top.
This curve is loaded automatically when the program starts, but you can manually change it at any time. You can also change the curve start time, although that's not very useful and can cause a line segment to disappear if you set it to an earlier time. It's best to leave that alone. Click OK to close this window.
The curve will show in the main window as a yellow line in the left graph. The temperature bug at the right will follow the curve automatically, if present.
Precool the Dewar, add dry ice ballast if desired, and then lower the rack and tissue into the dewar. Plug in the fan, and then turn on the software automation by clicking the red automation Temp button at the top.
Initial Cooling
Once automation is started, it will be aggressively cooling to the first setpoint. The initial pulse values of 4 seconds On and 0.5 seconds Off are probably close, but you should tweak them as needed. Once the temperature reaches the ramp set point, it will switch automation mode to Steady.
Steady Mode
Pulse Time On is still under your control, and 4 seconds works well at first. It can be turned down to 2 or 3 seconds if needed. You will not have control over the "Pulse Time Off", since that will be under the control of the automation, based on the temperature bug, the current temperature, and the PID. This is identical to the automation described more fully at the bottom of Liquid Nitrogen Chiller.
After the first 10 hours or so, agressive cooling will no longer be required. It's time to switch off the fan. At the same time, reduce the Pulse Time On to 0.5 seconds. The entire system will calm down, most of the external frost will melt, and it will use far less LN2. In this configuration, it's safe to leave overnight with proper remote monitoring.
Alerts
Configure alerts in the Setup window. The default behavior is for a text message to be sent to all staff if the one minute average temperature goes more than 3 degrees above the curve. The alerts will contain the current temperature. Wait until the temperature is very stable on the curve, and then turn on the alert button at the upper left. When an alert is sent, it will also show HIGH TEMP at the upper left and a message box will come up. The HIGH TEMP warning will go away automatically after the one minute averate temperature goes back under the 3 degree warning threshold for 1 to 2 minutes (which feels like a long time).
Monitoring
The typical cooldown takes 7 or 8 days, and it runs unattended at night. Aim a security camera at the dewar and the computer screen. Make sure Windows will not do an update or go to sleep. Overnight, monitor the camera remotely on your phone and also listen for text alerts.

